If you’re itching for a game of pickleball but don’t have an official court nearby, no problem! Whether you have space indoors or outdoors, we’ll show you what you need so that you can play pickleball without a court.
How To Play Pickleball Without A Court
First, you will need to set up your court. Here is everything that you will need to make your own pickleball court.
The Pickleball Net
The first thing you will undoubtedly need is a portable net. Not all portable nets are made equal. You will want to buy a model like this one with support in the middle. Otherwise, the net tends to sag. You will want the net to be 36 inches in height.

Line Markers
There are three different ways to make pickleball lines depending on the type of surface that you will be playing on. How you choose to make the lines also depends on how temporary you want the court to me. The easiest and most temporary way to make line markers is using court markers.

The next level of permanence that will last longer is to use court tape. There are many on the market targeted for a pickleball court. But you don’t need anything fancy or expensive. You can use an affordable painters tape like this one.

The last option is to use washable chalk. These work great for outdoor concrete.

Once you have your pickleball net and choice of line markers, you’re ready to start building your court.
How To Make A Pickleball Court
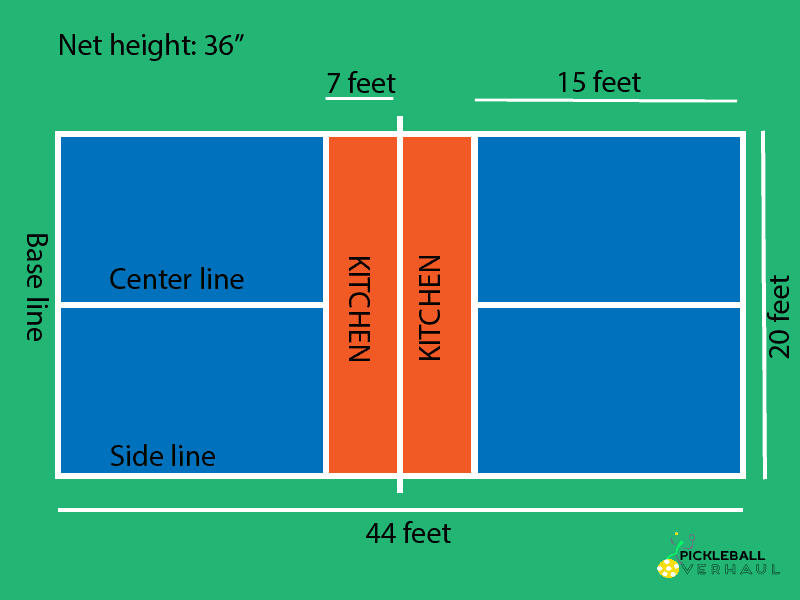
Once you have all your supplies, grab a measuring tape that is at least long enough for each side for easier set up. Here are the measurements that you will need.

The biggest challenge of making your own pickleball lines will be squaring up the lines so that they’re even on both sides. While you can use any method, we find this method to be the easiest way. Setup and center your net.
Step 1.
Set up your net and start from the center of the net to make your center line. Starting from the center line will help make your court square up evenly because it will give you a reference distance from both sides. From the center of your net, measure 7 feet out and make a mark. This is where the Kitchen or non-volley zone line will be.
Step 2.
From the Kitchen mark, measure 15 feet and make a mark. This is where your centerline and baseline will meet. Connect the two marks that you just made to get your center line.
Step 3.
From your center line, measure 10 feet on both sides, aiming your measuring tape to be parallel to the net and make a mark. This is where your sideline and baseline will meet. You can then connect them to make your baseline. You will now have a center line and a baseline.
Step 4.
Going back to the net, start from the center of your net and measure 10 feet in both directions and make a mark. This step is important because your portable net will be most likely longer than 20 feet. You will now have the start of your sideline.
Step 5.
From the start of your sideline, measure 7 feet towards your baseline and make a mark for the Kitchen line. Connect the start of your sideline to the baseline. You will now have sidelines, a center line, and a baseline.
Step 6.
The last step is to draw up your kitchen line by connecting the two Kitchen marks from both sidelines, making sure to go over the very first mark at the center line that you made in Step 1.
Step 7.
Repeat on the other side of the court.
You are now ready to play some pickleball! Just grab some paddles and balls and have fun.
Read Next: Pickleball 101: How To Play Pickleball
Read Also: Pickleball Gear: What You Need And What You Don’t

